Does importing publish anything?
No. Applied rows become private drafts, and you publish each card from its editor when it is ready.
 Help Center
Bring a whole team into Zapped from a spreadsheet and check every row before anything is saved.
The CSV import turns spreadsheet rows into private profile drafts, with contact details and a photo for each person. A preview shows what each row would do before you apply it, and nothing is published by the import.
You have a spreadsheet of people, such as a team list or an exhibitor list, and you want one card per person.
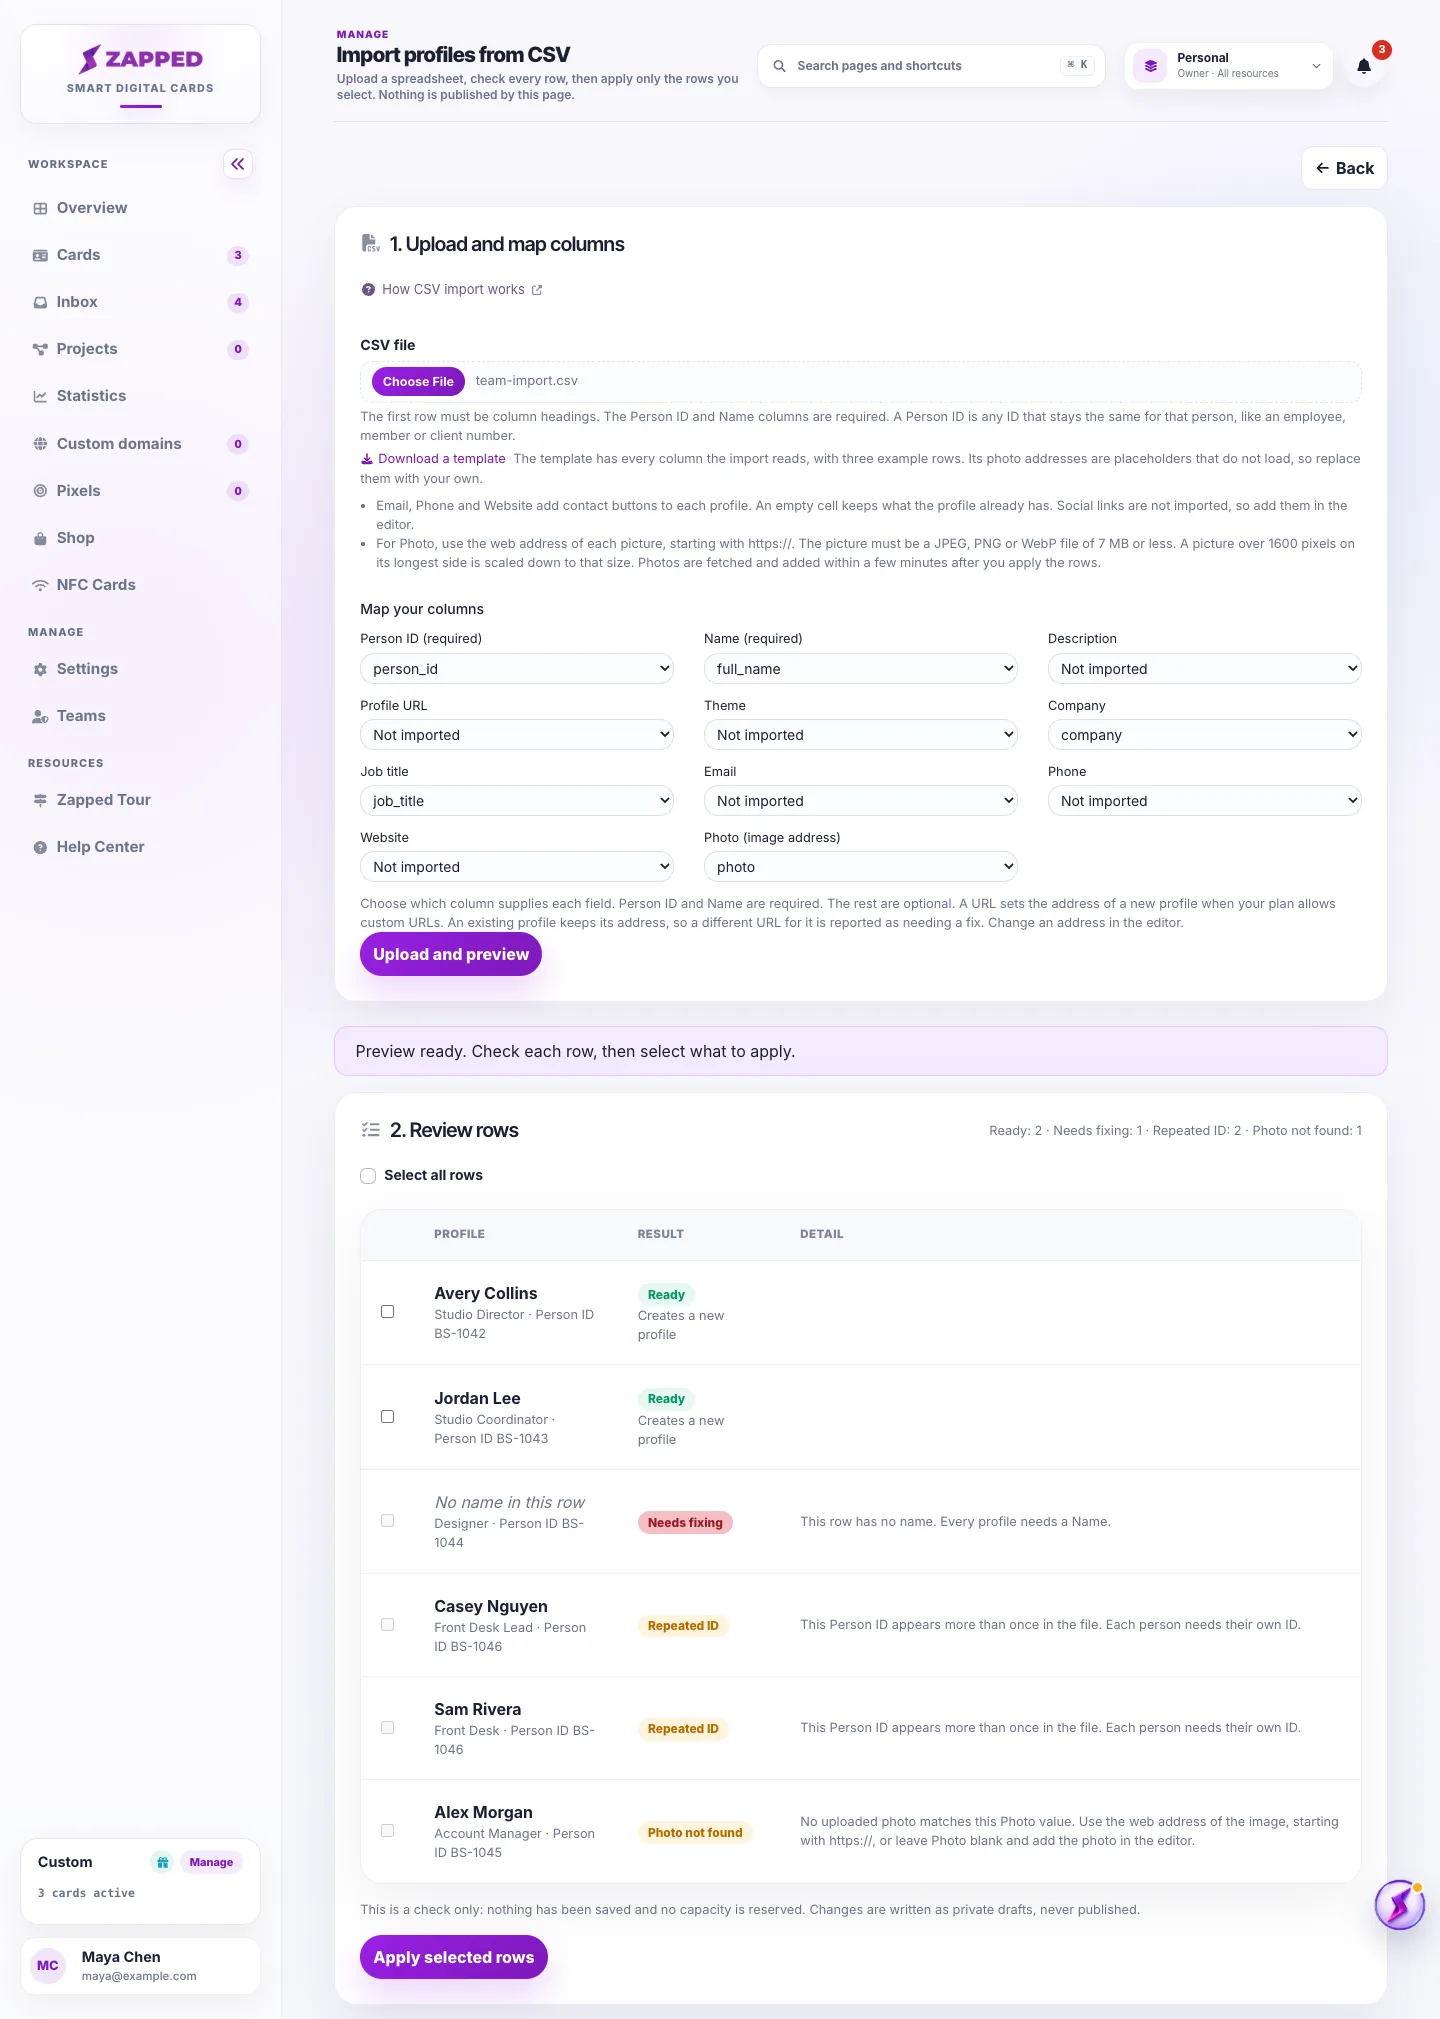
The preview is a check only: nothing has been saved. Applying rows writes private drafts and never publishes. Publish each card from its editor, or let an integration request a review.
The sample file on the import page uses these headings: person_id, name, job_title, company, description, profile_url, theme, email, phone, website and photo_url. Keep a heading row in your own file, match your headings to the fields below, and check every mapping choice in step 1.
The text limits are checked per row. A value that is too long is reported on its row instead of being cut, so you can shorten it and upload the file again.
Email, Phone and Website become contact buttons on the profile, the same email, call and website buttons you can add in the editor. The import marks the buttons it adds as its own.
Importing the same Person ID again updates those buttons in place instead of adding second copies. Buttons you added by hand in the editor are never changed or removed by an import.
An empty contact cell keeps what the profile already has. An import never removes a contact button, so delete one in the editor when it is no longer needed. If you delete a button the import added, the next import that has a value for it adds it again.
A new button counts toward your plan limit of buttons on one profile. A row that would go over the limit is reported as needing a fix and is not applied.
Social links are not imported. Add them in the editor. Custom code, tracking pixels, custom domains, branding and layout are not touched either, and an import never publishes a profile.
A file can hold up to 500 rows and 2 MB. It must be comma separated, saved as UTF-8, and start with a heading row.
Files that use semicolons between columns, files saved in another encoding and files that are not CSV are rejected with a message that says how to resave them.
An account can have up to 2000 rows waiting in its import queue at once. An import that would go over that is declined, and you can apply it again after earlier imports finish.
Keep CSV quoting valid. Put quotes around an entire cell that contains commas or line breaks, and represent a quote inside that cell as two quotes. An unmatched quote or a quote inside an unquoted cell causes the file to be rejected instead of merging rows.
Importing the same Person ID again updates the same card instead of creating a second one. An existing profile keeps its address, so a different Profile URL for it is reported as needing a fix. Each applied row links to its editor.
The ID is matched exactly, so keep the spelling and the spacing identical between files. An ID with a space at the end is treated as a different person.
Rows that repeat a Person ID inside one file are all rejected, so no row wins by position.
Zapped does not open photo addresses while you preview or apply the file. When you apply the rows, each profile is saved first with its text and contact details. The photos are then fetched in the background, usually within a few minutes, and the import page shows each one as Photo added or Photo not added with the reason.
A photo that cannot be used never undoes the rest of its row. The profile keeps its name, job title and contact details, and you can add the picture in the editor.
For safety, photo addresses must start with https:// and use a host name, not an IP address or a port number. Addresses that redirect to another address, point to a private network, return something other than a JPEG, PNG or WebP image, or are larger than 7 MB are not used.
A picture wider or taller than 1600 pixels is scaled down so its longest side is 1600 pixels. Its shape is kept, and a photo taken sideways on a phone is turned upright first. Pictures of about 12 megapixels or less, such as 4000 by 3000 pixels, are always processed. A much larger picture may be reported as too large to process, so resize it and import the row again.
If you change a profile photo in the editor before the imported one is fetched, your change is kept and the imported photo is not used. Importing the same photo address again does not create a new draft version when the picture has not changed.
The photo addresses in the sample file point to example.com, a placeholder domain that has no photos, so those rows report Photo not added. Replace them with the addresses of your own pictures.
Recent imports at the bottom of the import page lists your last 20 imports, newest first, including imports sent through the API. Each one shows when it started, how many rows were applied, how many profiles were created or updated, how many rows had no changes or need a fix, and how many photos were added or not added.
Open Why photos were not added on an import to see each reason and how many photos it affected. Photos that are still being fetched are shown as waiting.
The status shows whether an import is Running, Paused or Complete. An import is Paused while profile drafts are turned off, and it continues by itself when they are turned back on.
Row results and photo reasons are kept for 90 days after an import finishes. After that only the date, the number of rows and the status remain.
An API key that expires cannot make new requests, but work already accepted for it can continue. Revoking the key stops its unfinished rows and pending imported photos; cancellation is recorded in background batches. Completed rows and existing drafts are retained.
Revoked work stops counting against the waiting-row limit immediately. Accepted work from an expired but unrevoked key still counts until it finishes. Dashboard imports do not depend on an API key.
CSV profile import is included with Starter and Professional. Free and Lite do not include profile import. Existing card and block limits still apply. Importing from the dashboard does not require an API key; importing through an outside tool also requires Professional API or MCP access.
No. Applied rows become private drafts, and you publish each card from its editor when it is ready.
The second import updates the same profiles, because the Person ID decides which card each row belongs to.
Person ID and Name. A row that is missing either one is reported as needing a fix and is not applied.
Yes. Map the Email, Phone and Website columns and each profile gets those contact buttons. Social links are not imported, so add them in the editor.
The reason is shown on the row, for example an address that redirects or a file that is not a JPEG, PNG or WebP image. Fix the address or the picture and import the row again, or add the photo in the editor.
Open the import page again. Recent imports lists your last 20 imports with the photos added and not added, and the reason for each photo that was not added.
Was this guide helpful?