The show is over, the export is sitting in your downloads folder, and row 212 is a woman your sales team has been emailing for six months. If you import that file as a pile of new Leads, she becomes a stranger with a second record, and nobody can tell she met you at the booth. The fix is two separate jobs: find out who each person already is in Salesforce, then record that they came through the show. A clean match doesn't do the second job for you.
If you only need the broader picture of running the event itself, the event lead capture workflow covers it. This guide starts where the file lands.
Make the show a Campaign before any row moves
In Salesforce, the show is a Campaign, and the people attached to it are Campaign Members. A member can be either a Lead or a Contact, which matters because your booth list will contain both.
Creating the record is quick. Salesforce requires a Campaign Name and Currency and nothing else to get started, so name it something your reports will still make sense of next year, like the show and the year.
Then set the statuses before you import, not after. Salesforce lets you define Campaign Member Statuses for each Campaign, pick a default, and flag which ones count as a response. Its own event examples are Invited, Registered and Attended, but you can use whatever matches what actually happened at your booth, such as Scanned and Had conversation. In Lightning, open the Campaign, find the Campaign Member Statuses related list, and select New to add each one.
Two details are worth knowing now. Statuses never change on their own after someone interacts with you, so whoever imports the file decides each person's status. And in the Wizard, a blank or invalid status is replaced by the Campaign's default. If your default is Registered and your file has a typo in the status column, those people quietly show up as registered. Choose the default with that in mind.
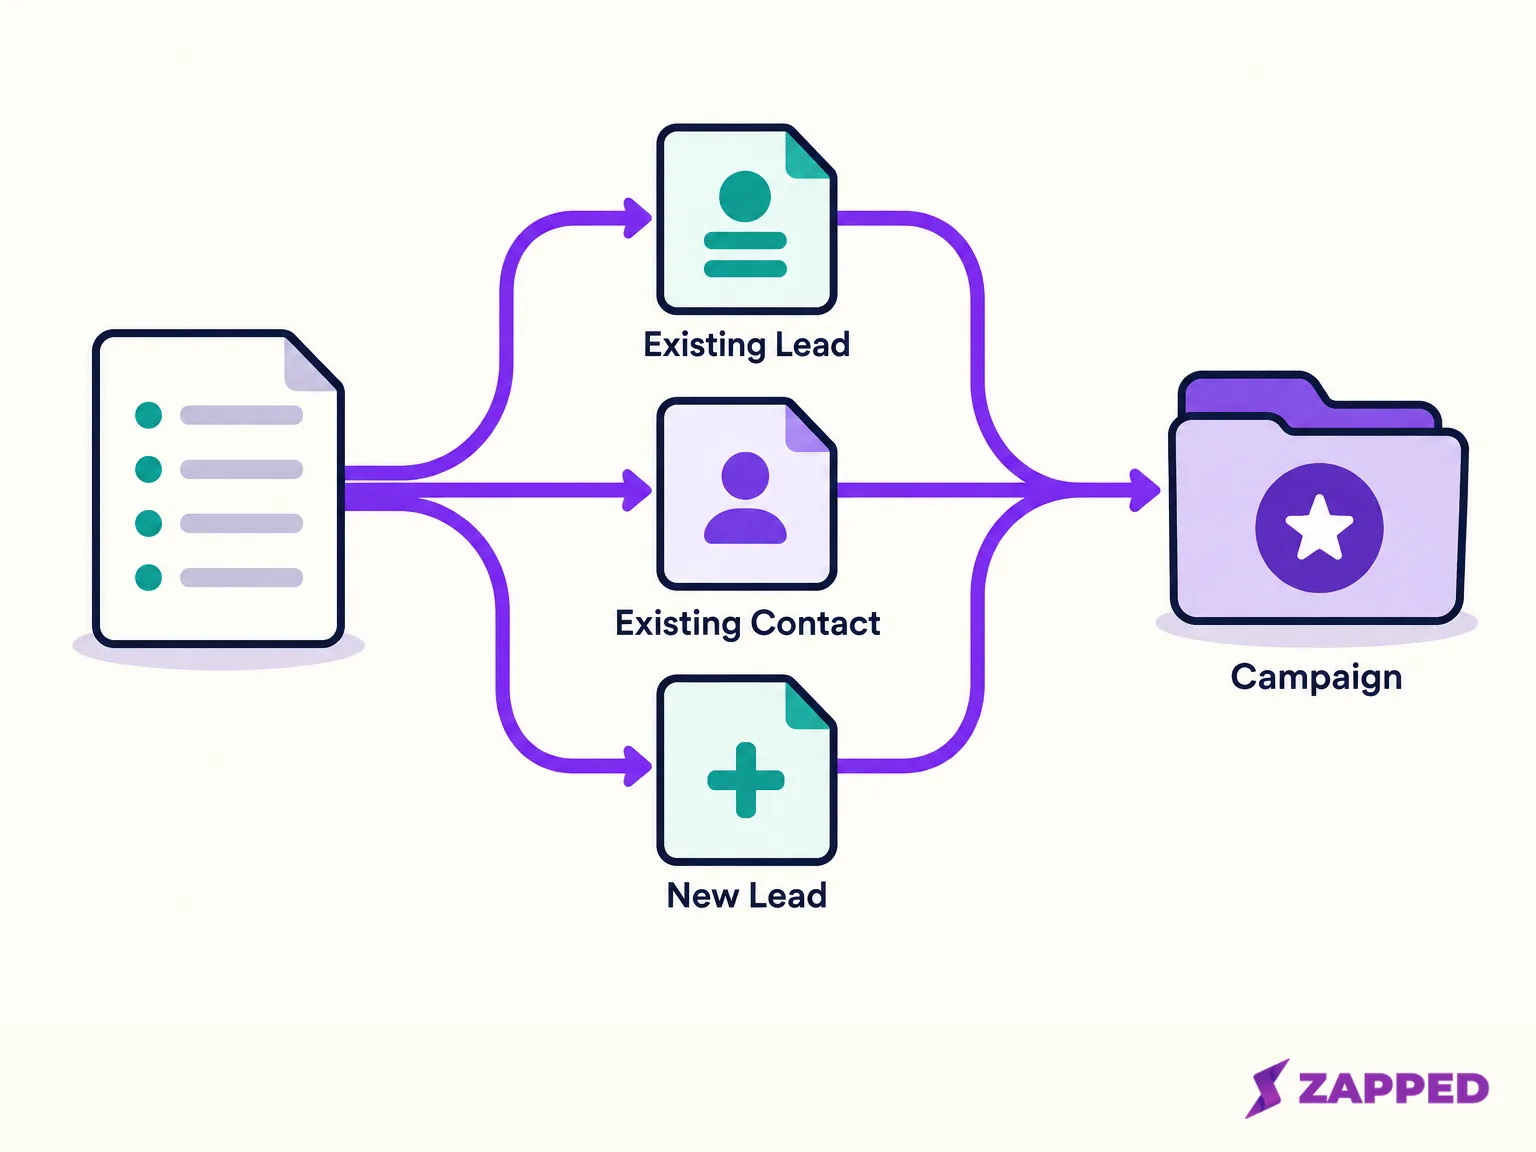
Sort every row into one of three piles first
Before you pick a tool, decide what each row is. Salesforce keeps Leads and Contacts in separate places, and a Lead is converted into a Contact later, under rules your org controls. Conversion isn't a way to merge records at import time, and it can't be undone, so don't lean on it to clean up a bad import.
Salesforce's public help describes separate import paths for existing Leads, existing Contacts, new Leads and new Contacts. It doesn't describe one built in step that checks both objects and routes every row for you. So the three way sort is your team's review, done in the spreadsheet or with a report of existing records, before anything is written.
| What you find | What to do | Why |
|---|---|---|
| The person is already a Lead | Update that Lead and add it to the Campaign | One person, one record, now tied to the show |
| The person is already a Contact | Add the existing Contact as a Campaign Member | A Contact isn't a new Lead, so don't create one |
| Neither object has them | Create a new Lead and add it to the Campaign | Only genuinely new people become new records |
| You can't tell | Hold the row and ask an admin | A guess here makes a duplicate you'll chase for months |
Duplicate rules can help, but they aren't a safety net. Salesforce's standard Contact duplicate rule matches across Contacts and Leads in orgs created in Summer '17 or later, while older orgs and custom setups can differ. The same rule can alert or block, and either way it doesn't merge anything. Even the Wizard's Campaign Member import won't merge duplicate records or their data. People who've been through this with a real trade show list describe the same mess, with post show spreadsheets full of people already in the CRM. That's a good reason to match first and treat the duplicate rule as a backstop.
Clean the file, then pick the import route
Keep the original export untouched and work in a copy. Remove repeated rows within the file, confirm required fields and picklist values with your admin, and add the columns each route needs. It also helps to export your matching Leads and Contacts from Salesforce with their IDs, because several of the routes below match on ID.
Then choose by how much control the job needs.
Data Import Wizard. For an ordinary file, this is the default. It takes CSV only, up to 50,000 records at a time, and Salesforce recommends trying a small file first. Run one import at a time, since it doesn't support concurrent jobs, even from separate browser windows.
To start, open Setup, search for Data Import Wizard, choose it, and select Launch Wizard. You choose the object and whether you're adding, updating, or both, set the match rule, upload the CSV, map fields, and select Start Import. Two cautions apply. Unmapped fields are not imported, and Salesforce warns that its default mappings aren't always accurate, so read the mapping screen instead of clicking through it.
The Campaign flavor of the Wizard has a separate recipe for each case. For Leads, choose Leads, add new and update existing, match by Email, and select Assign leads to campaigns. For Contacts you already hold, match both the Contact and the Account by Salesforce ID. For new or updated Contacts, match Contacts by Email and Accounts by Account Name and Account Site. If your Leads already exist and only need the show attached, the documented path starts from the Campaign's Manage Members action and matches by Salesforce ID.
Data Loader. Reach for it when you have stable IDs and want explicit control over each step. An Upsert updates a record when the Salesforce ID or External ID you chose matches, and creates one when nothing does. That's useful for the Lead or Contact itself. Attaching it to the show is a second operation.
For that second step, the Lead or Contact has to exist already, and your CSV needs three columns: CampaignID, either LeadID or ContactID, and Status. Choose Insert, select Show all Salesforce objects, pick Campaign Member (CampaignMember), and map those columns. The same Salesforce article notes you may need Marketing User access to see the object, so if CampaignMember isn't in the list, that's the first thing to check.
A capture tool's connector. Only use one if you can see what it does. Before you trust it, find in the vendor's current documentation which record it creates or updates, how it matches against Leads and Contacts, how it sets the Campaign and Member Status, how it assigns owners, and where failures show up. If any of that is vague, export a CSV and use Salesforce's own import results instead. Nothing here endorses a particular connector.
Decide who owns each person before the file goes in
Owner problems tend to show up the morning follow-up starts, when a rep opens their list and it's empty. There are two clean ways to avoid that.
If an active Lead Assignment Rule should decide, let it. Those rules evaluate entries in order, assign a match to a user or queue, and fall back to a default owner or the importing administrator when nothing matches. In that case you don't need an owner column in the file at all.
If you'd rather name the owner in the file, map it with a Salesforce User ID. Salesforce recommends the ID over a full name or email, because names and emails can be ambiguous. Whichever you pick, check the owner on a few imported records afterward. If it isn't who you expected, pause follow-up and have the admin look at the active rule and the mapped owner.
Run a small sample, then read what came back
Don't send the whole list first. Take ten or twenty rows that include at least one of each type, an existing Lead, an existing Contact, and a new person, and import only those.
Then check the results where they live. In the Wizard, open the import status and read the success and error results. With Data Loader, the success file lists loaded records and the error file lists rejected ones. Fix only the rows that failed or landed wrong, rather than re-running the whole file, or you'll create the duplicates you were trying to avoid.
A few errors are worth recognizing. A "Use one of these records?" message in Data Loader means a duplicate or matching rule is active, so that row needs a human decision. An empty column error means the empty columns should be removed from the CSV before you rerun it.
Then open the Campaign itself and confirm what a rep will actually rely on: the right people are members, each has the status you intended, Leads and Contacts sit under the correct object, and the owner is right. If you need to correct statuses afterward, the Wizard can update Campaign Members in bulk when you map the member's Salesforce ID, Status and the Campaign ID. Once the sample looks right, repeat the same steps with the remaining rows.
If part of your list came from a Zapped card form
Some event contacts may have filled in a lead form on a Zapped card instead of being scanned. Those answers land in Inbox, where you can export the filtered leads to CSV, import them as text columns so phone numbers keep their leading zeros, and run them through the same sort and Campaign steps. Retention on the current plans is one month on Free, six months on Starter and unlimited on Professional, which also has lead webhooks for a team that runs its own automation destination, though Zapped offers CSV export and generic webhooks, not a native Salesforce connector.
For a card form that should feed Salesforce directly, the Web to Lead guide covers the ceiling and the Company requirement.
When something doesn't match
If you can't tell whether a row is a Lead or a Contact, or the Campaign Member import path isn't there, pause just those rows. Ask a Salesforce admin to check active duplicate rules, permissions, required fields and owner assignment, then run the small sample again and compare Campaign Members and results before releasing the rest. If the list itself hasn't been released from the event platform yet, confirm the retrieved list first, since fixing it in Salesforce afterward is much slower.