
As the world has become more digitally connected, traditional paper business cards have become increasingly outdated. Creating a digital card is a smart way to ditch the paper cards and embrace a modern approach to networking. Digital business cards allow you to include all your contact details, and the digital business card solution is more eco-friendly and efficient compared to physical cards.
With a digital business card maker, you can create custom cards with unique card designs, QR Codes, and card details that showcase your brand. The digital business card creation process is simple and requires just a few steps, including selecting a card layout, adding your basic contact details, and uploading a card image.
In this article, we will guide you through the steps to create a digital business card on your Mac.
Step 1: Choose a Digital Business Card Platform

The first step is to choose a electronic business card platform that fits your needs. When selecting a digital business card platform, consider the following factors:
- Price: Some platforms are free, while others require a subscription fee or a one-time purchase.
- Features: Look for platforms that offer customization options, analytics, and integration with other tools.
- Design options: Consider the platform’s pre-designed templates and customization options to ensure that you can create a unique and professional-looking electronic business card.
- Compatibility: Make sure that the platform is compatible with your Mac and other devices you plan to use to share your digital card.
There are various options available, both free and paid, that can help you create a professional and visually appealing virtual business card. Some popular options are:
- Adobe Spark
- Canva
- About.me
Each platform has its own set of features and designs, so it’s essential to explore and compare them before choosing one.
Step 2: Select a Template
Once you have selected your preferred platform, the next step is to select a template for your digital business card. Most platforms have pre-designed templates that you can use as a starting point. You can select a template that best represents your profession or industry.
When selecting a template, consider the following:
- Industry: Choose a template that reflects your industry or profession. For example, if you’re a graphic designer, you may want a template that showcases your portfolio.
- Brand identity: Look for templates that match your brand colors, fonts, and style to create a cohesive and professional look.
- Visual appeal: Choose a template that is visually appealing and easy to read. Avoid templates with cluttered layouts or hard-to-read fonts.
Step 3: Add Your Personal Information

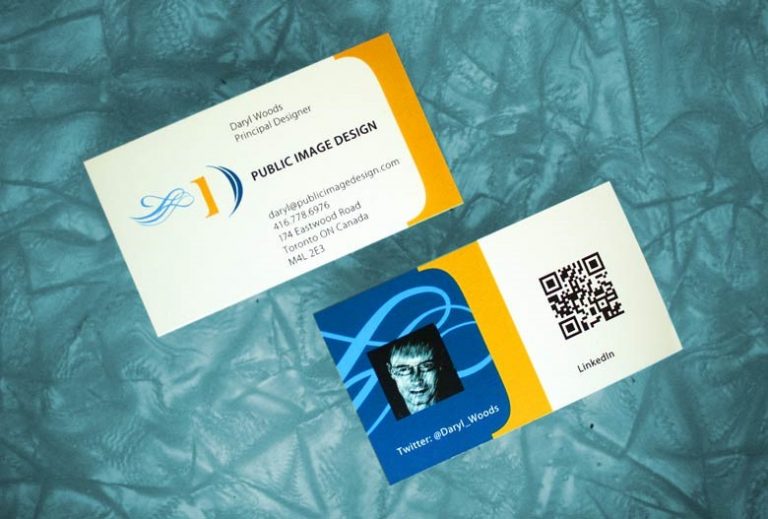
The most critical aspect of a business card is the information it carries. When creating your E-business card, you should include your essential information, such as your name, job title, company name, email address, phone number, website, and social media links. Make sure that the information is accurate and up to date.
When adding your personal information, consider the following:
- Essential details: Include your name, job title, company name, email address, phone number, website, and social media links.
- Call-to-action: Consider adding a call-to-action to encourage potential clients or employers to contact you.
- Accurate information: Double-check that all the information you add is accurate and up to date. Typos or outdated contact information can harm your professional image.
Step 4: Customize the Design
After adding your personal information, it’s time to customize the design to make it stand out. You can adjust the color scheme, font, and layout to match your brand identity or personal preferences. Keep in mind that the design should be visually appealing and easy to read.
When customizing the design, consider the following:
- Color scheme: Choose colors that match your brand or create a visually appealing look. Consider using color psychology to create a specific mood or emotion.
- Font: Choose a font that is easy to read and matches your brand or personal style.
- Layout: Consider the placement of each element and ensure that the design is balanced and easy to read.
Step 5: Preview and Save

Before finalizing your digital business card, it’s essential to preview it to ensure that everything looks great. Check that all the information is accurate, the design is visually appealing, and the layout is easy to read. Once you are satisfied with the final product, save it in a format that is compatible with different devices, such as a PDF or image file.
When previewing your digital business card, consider the following:
- Compatibility: Ensure that the digital business card is compatible with different devices and platforms.
- Accuracy: Check that all the information is accurate and up to date.
- Visual appeal: Ensure that the design is visually appealing and easy to read.
Once you’ve finalized your digital business card, you can save it in various formats, such as a PDF or image file, and share it with potential clients, employers, or colleagues. You can also integrate it into your email signature, website, or social media profiles to increase your online presence and professionalism.
Benefits of Digital Business Cards for Networking
By using a business card generator, you can create a virtual card that can be easily shared via email, share links, or social networks, making it easy to expand your networking efforts. Additionally, you can use business card scanning apps to easily scan a batch of cards and save the information to your phone, making it easy to organize your contacts and make informed decisions when reaching out to potential clients or partners.
Ultimately, using digital business cards instead of traditional business cards can help you stand out from the crowd and make a lasting impression.
Conclusion:
Creating a digital business card on your Mac can be a straightforward process, especially if you have the right tools. You can use Google Wallet or Apple Wallet to store and share your card, and even include a user image for a more personalized touch. In addition, using your address book and business card creation apps can make the process even simpler.
With a generalized business card, you can include all your essential details, but you can also create additional business cards tailored to specific business contacts or events. One of the favorite features of digital business cards is the ability to update your contact profile, ensuring that your phone contacts always have the most up-to-date information.
Follow the above guide, and you’ll be well on your way to creating a digital business card that stands out and represents you and your brand professionally.
Use Zapped To Create Virtual Business Card
With so many options available, it can be overwhelming to choose the right platform to create a digital business card. However, we recommend using Zapped, a user-friendly digital business card maker that offers customizable templates, advanced design tools, and seamless sharing options. Zapped makes it easy to create a professional virtual business card that can be shared via email, share links, or social networks.
With Zapped, you can also scan a batch of physical cards and easily organize the contact info on your phone. Say goodbye to paper cards and switch to Zapped for a more efficient and eco-friendly networking solution. Try Zapped today and take your networking game to the next level!